
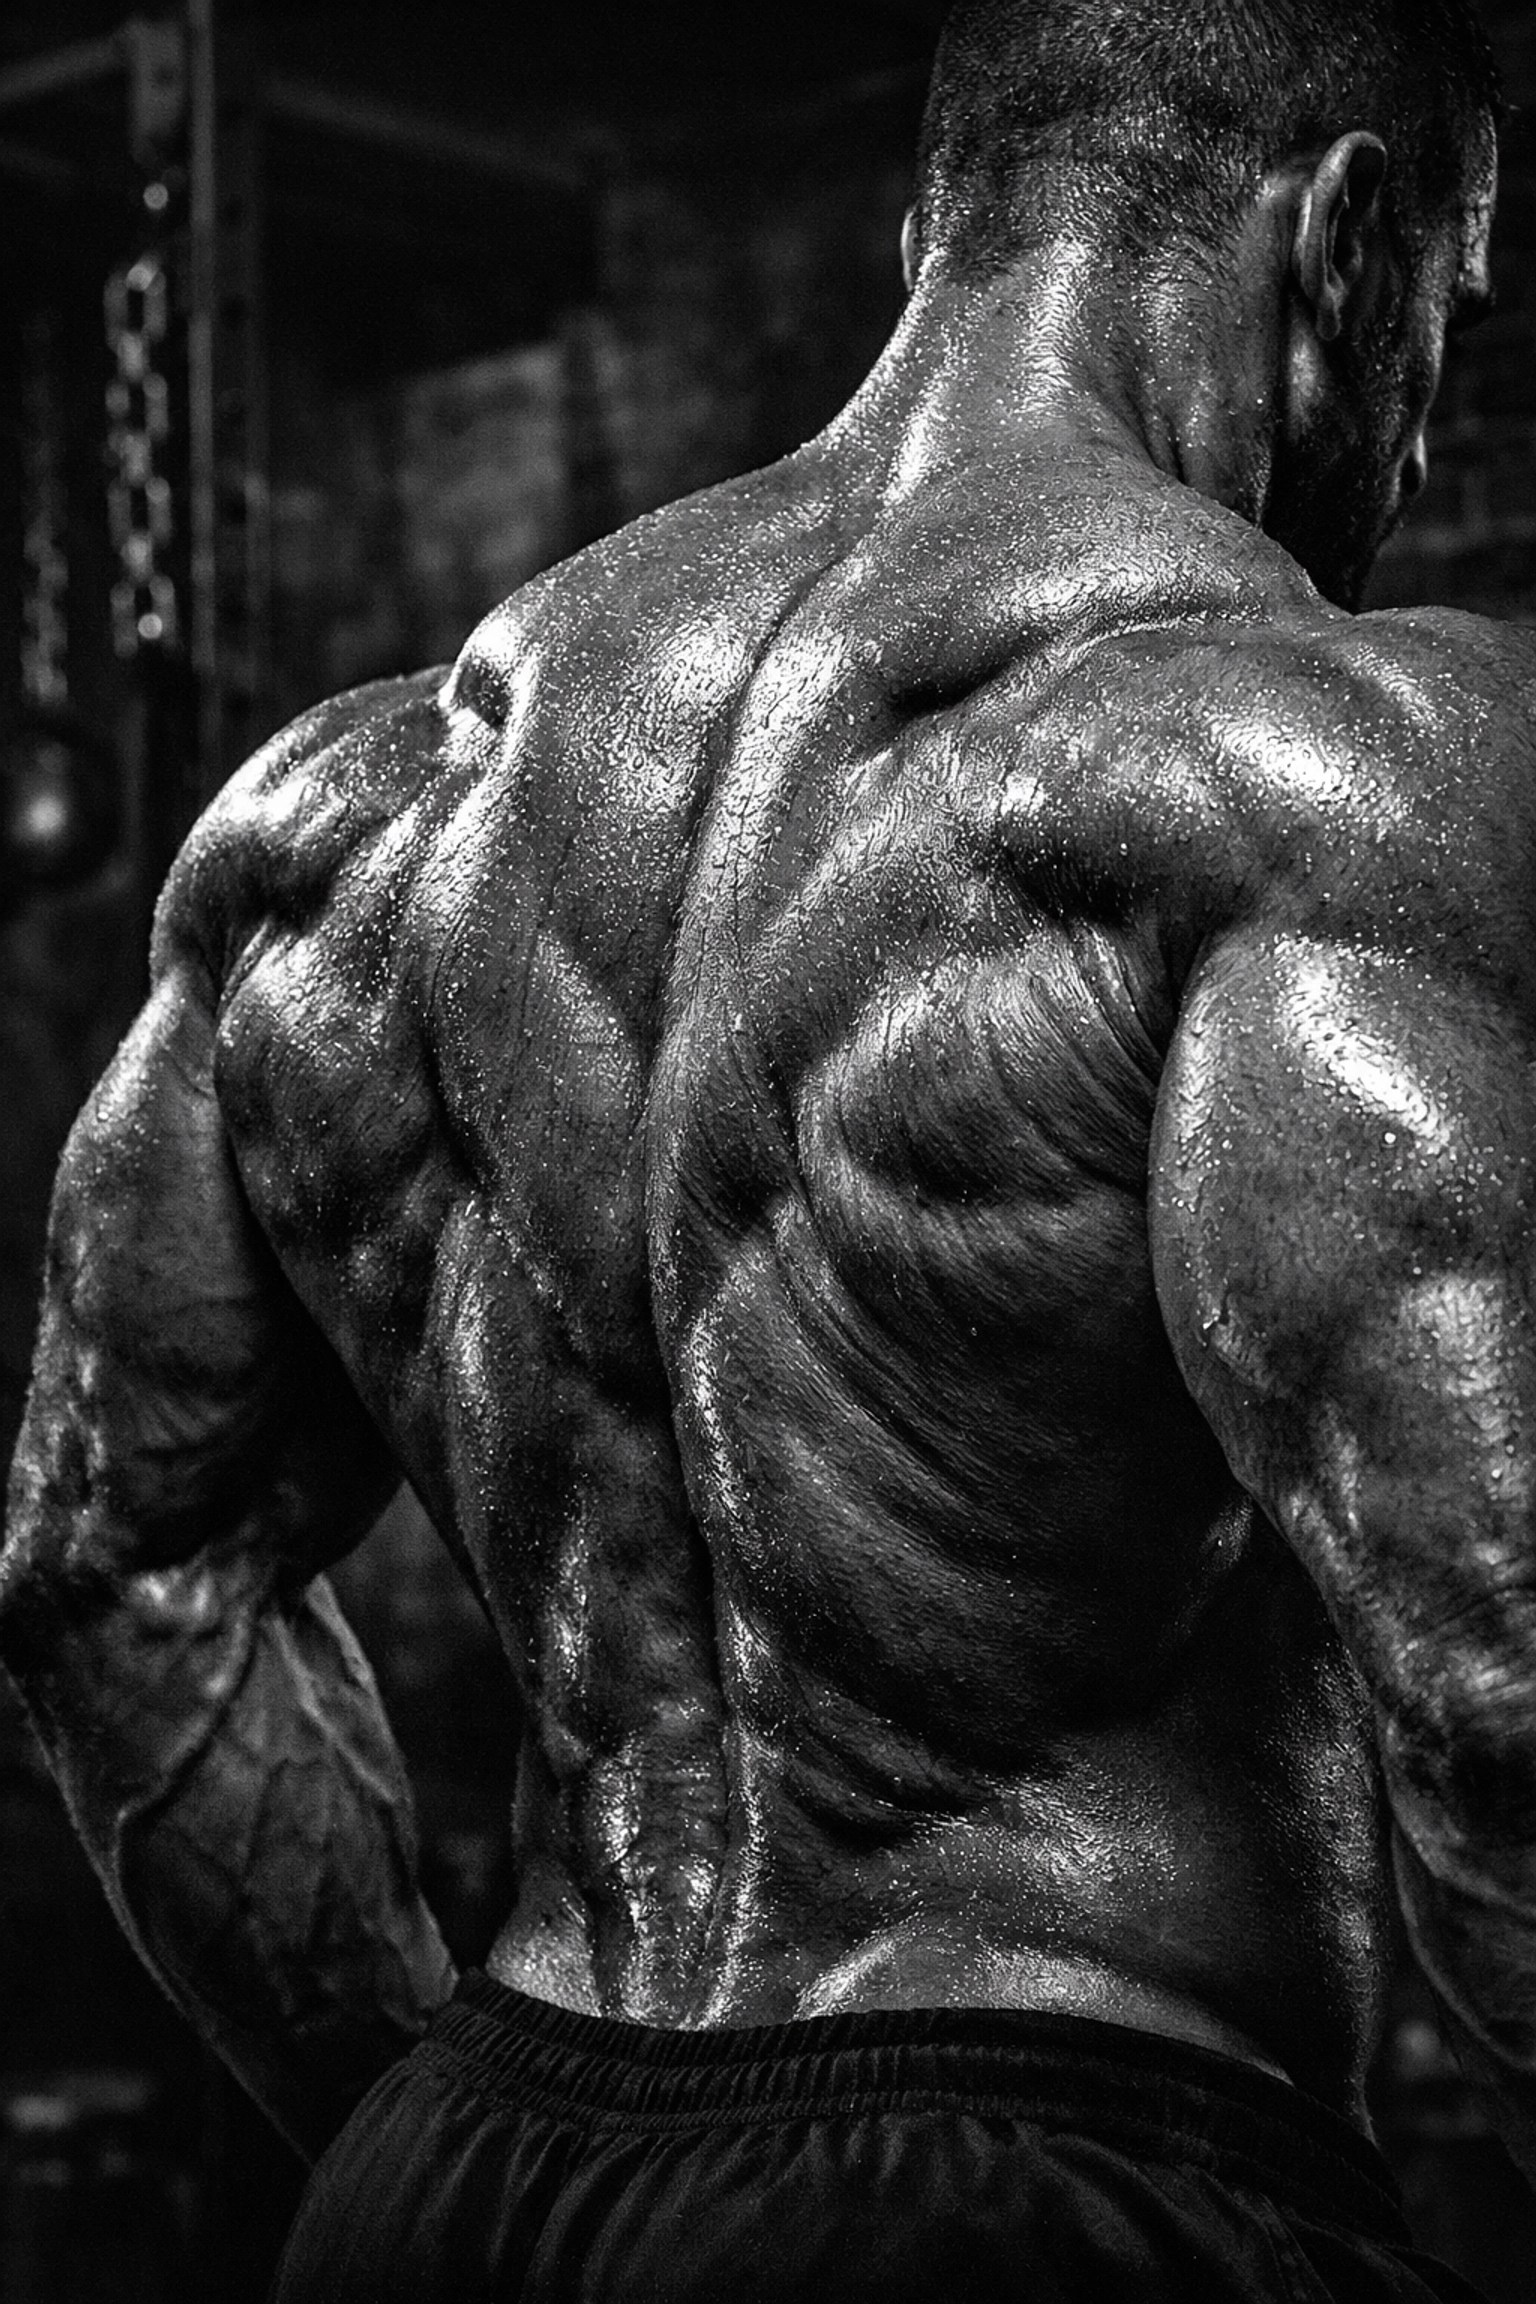
If you’ve spent any time in a gold-standard gym or scrolled through the social media feeds of elite athletes like Chris Bumstead or Nick Walker, you’ve seen it: the "wings." The lat spread is arguably the most iconic pose in bodybuilding, designed to showcase the sheer width and density of the latissimus dorsi.
But here’s the reality: a great lat spread isn't just about having a big back. It’s about the surgical control required to flare those muscles on command. Many lifters have the mass, but when they step in front of a mirror, their back looks like a solid block rather than a sweeping V-taper. Mastering the lat spread requires a deep mind-muscle connection, specific posing mechanics, and a recovery protocol that ensures your muscles aren't too inflamed to move fluidly.
In this definitive guide, we’re going to break down the mechanics of the lat spread, the training required to build that width, and why the "old school" way of recovering might be holding your progress back.
The Anatomy of the "Wings"
Before you can flare your lats, you need to understand what they are. The latissimus dorsi is the largest muscle in the upper body. It originates along the spine and the crest of the hip, stretching up to attach to the humerus (upper arm bone).
When you perform a lat spread, you are essentially pulling your scapula (shoulder blades) forward and outward while keeping your chest high. This creates the illusion of extreme width. However, if your lats are tight, inflamed, or poorly "connected" to your nervous system, you’ll find it nearly impossible to get that full flare.
The Mind-Muscle Connection: Finding Your Lats
The biggest hurdle for most athletes is that they cannot "feel" their back. Because we can’t see our backs while we train, the brain often defaults to using the biceps and traps to move the weight. To master the lat spread, you have to fix this.
1. The "Hook" Grip
Stop squeezing the bar like your life depends on it. A death grip engages the forearms and biceps. Instead, use a thumbless "hook" grip. Think of your hands merely as hooks and your elbows as the primary movers.
2. Lead with the Elbows
Whether you’re doing a pull-up or a row, the movement ends when your elbows can’t go back or down any further. If you continue the rep past that point, your biceps are doing the work.
3. Isometric Holds
Try to "flare" your lats without any weight. Stand in front of a mirror, place your hands on your hips, and try to push your elbows forward while keeping your shoulders down. If you can’t feel the muscle "pop" out, you need more isometric practice.
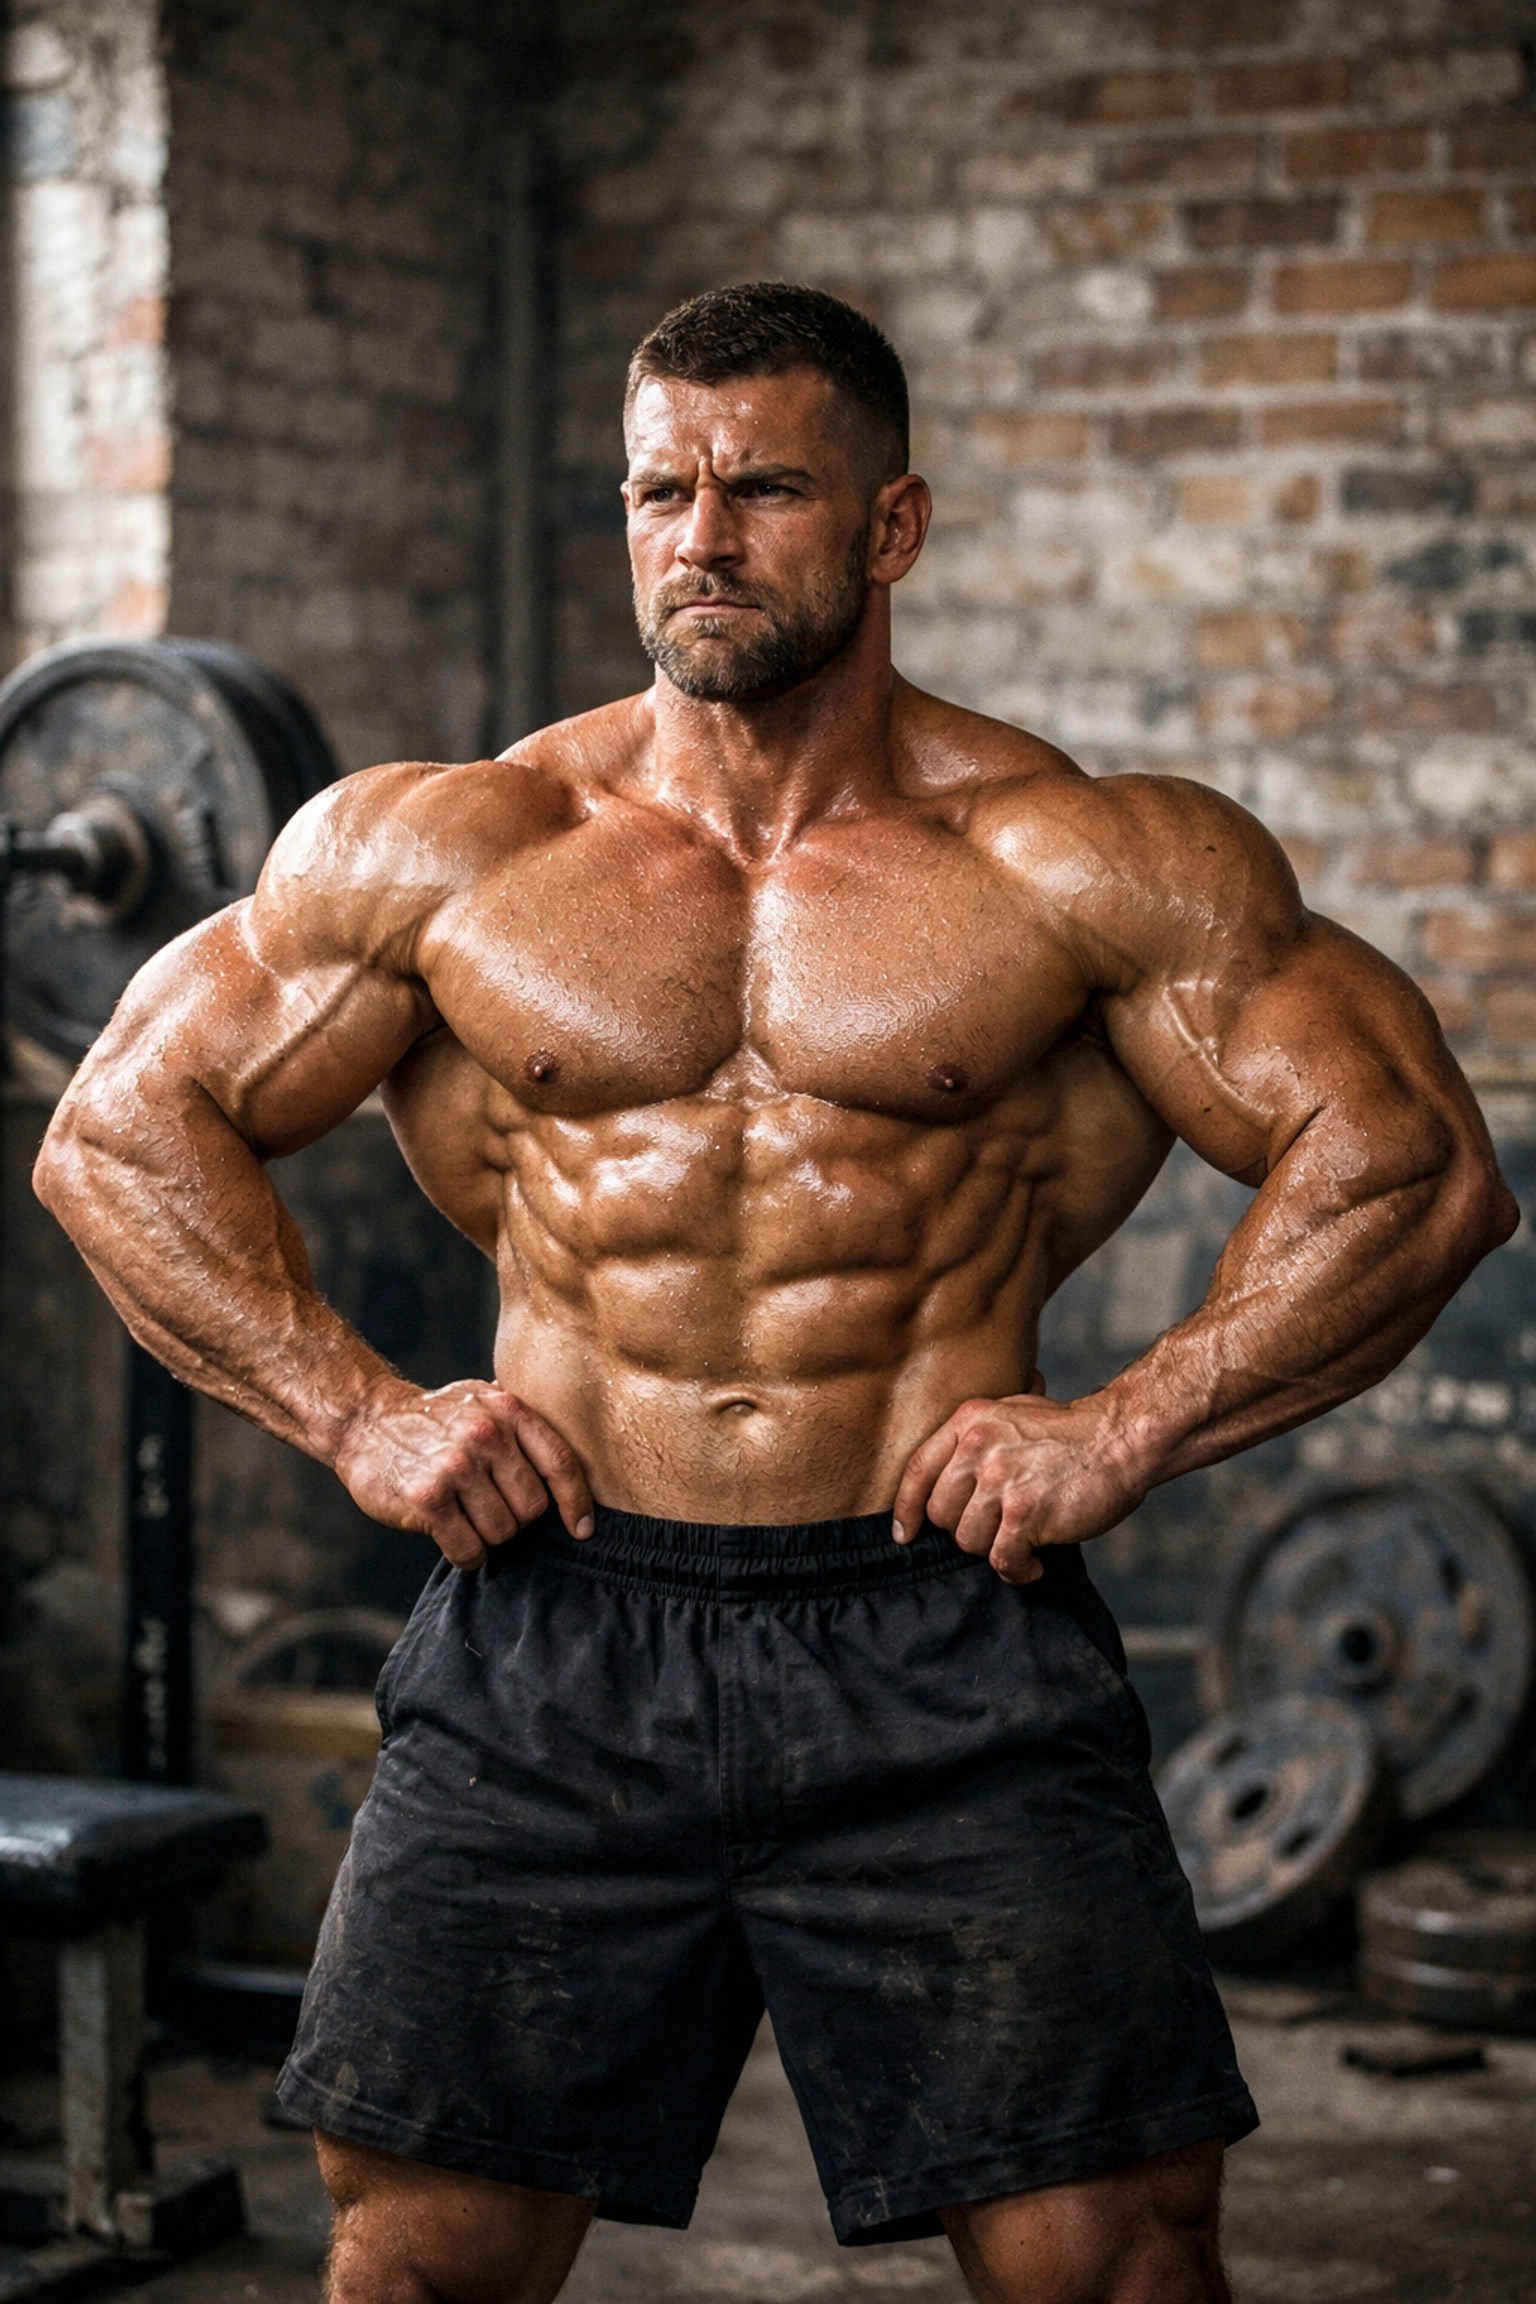
Execution: The Front Lat Spread
The front lat spread is designed to show off the V-taper from the front, highlighting the transition from a wide upper back to a narrow waist.
- The Foundation: Stand with your feet about shoulder-width apart. You can have one foot slightly in front of the other to create better balance and leg flow.
- The Hand Placement: Place your hands high on your waist, right above the hip bone. Use your thumbs and index fingers to "pinch" your midsection.
- The Chest Lift: Keep your chest high. Do not slouch. A high chest creates the space for the lats to flare.
- The Flare: This is the magic moment. Without moving your hands, try to drive your elbows forward and outward. Imagine you are trying to wrap your lats around to the front of your body.
- The Crunch: Once flared, slightly contract your abs. This creates a "hard" look and prevents you from looking bloated.
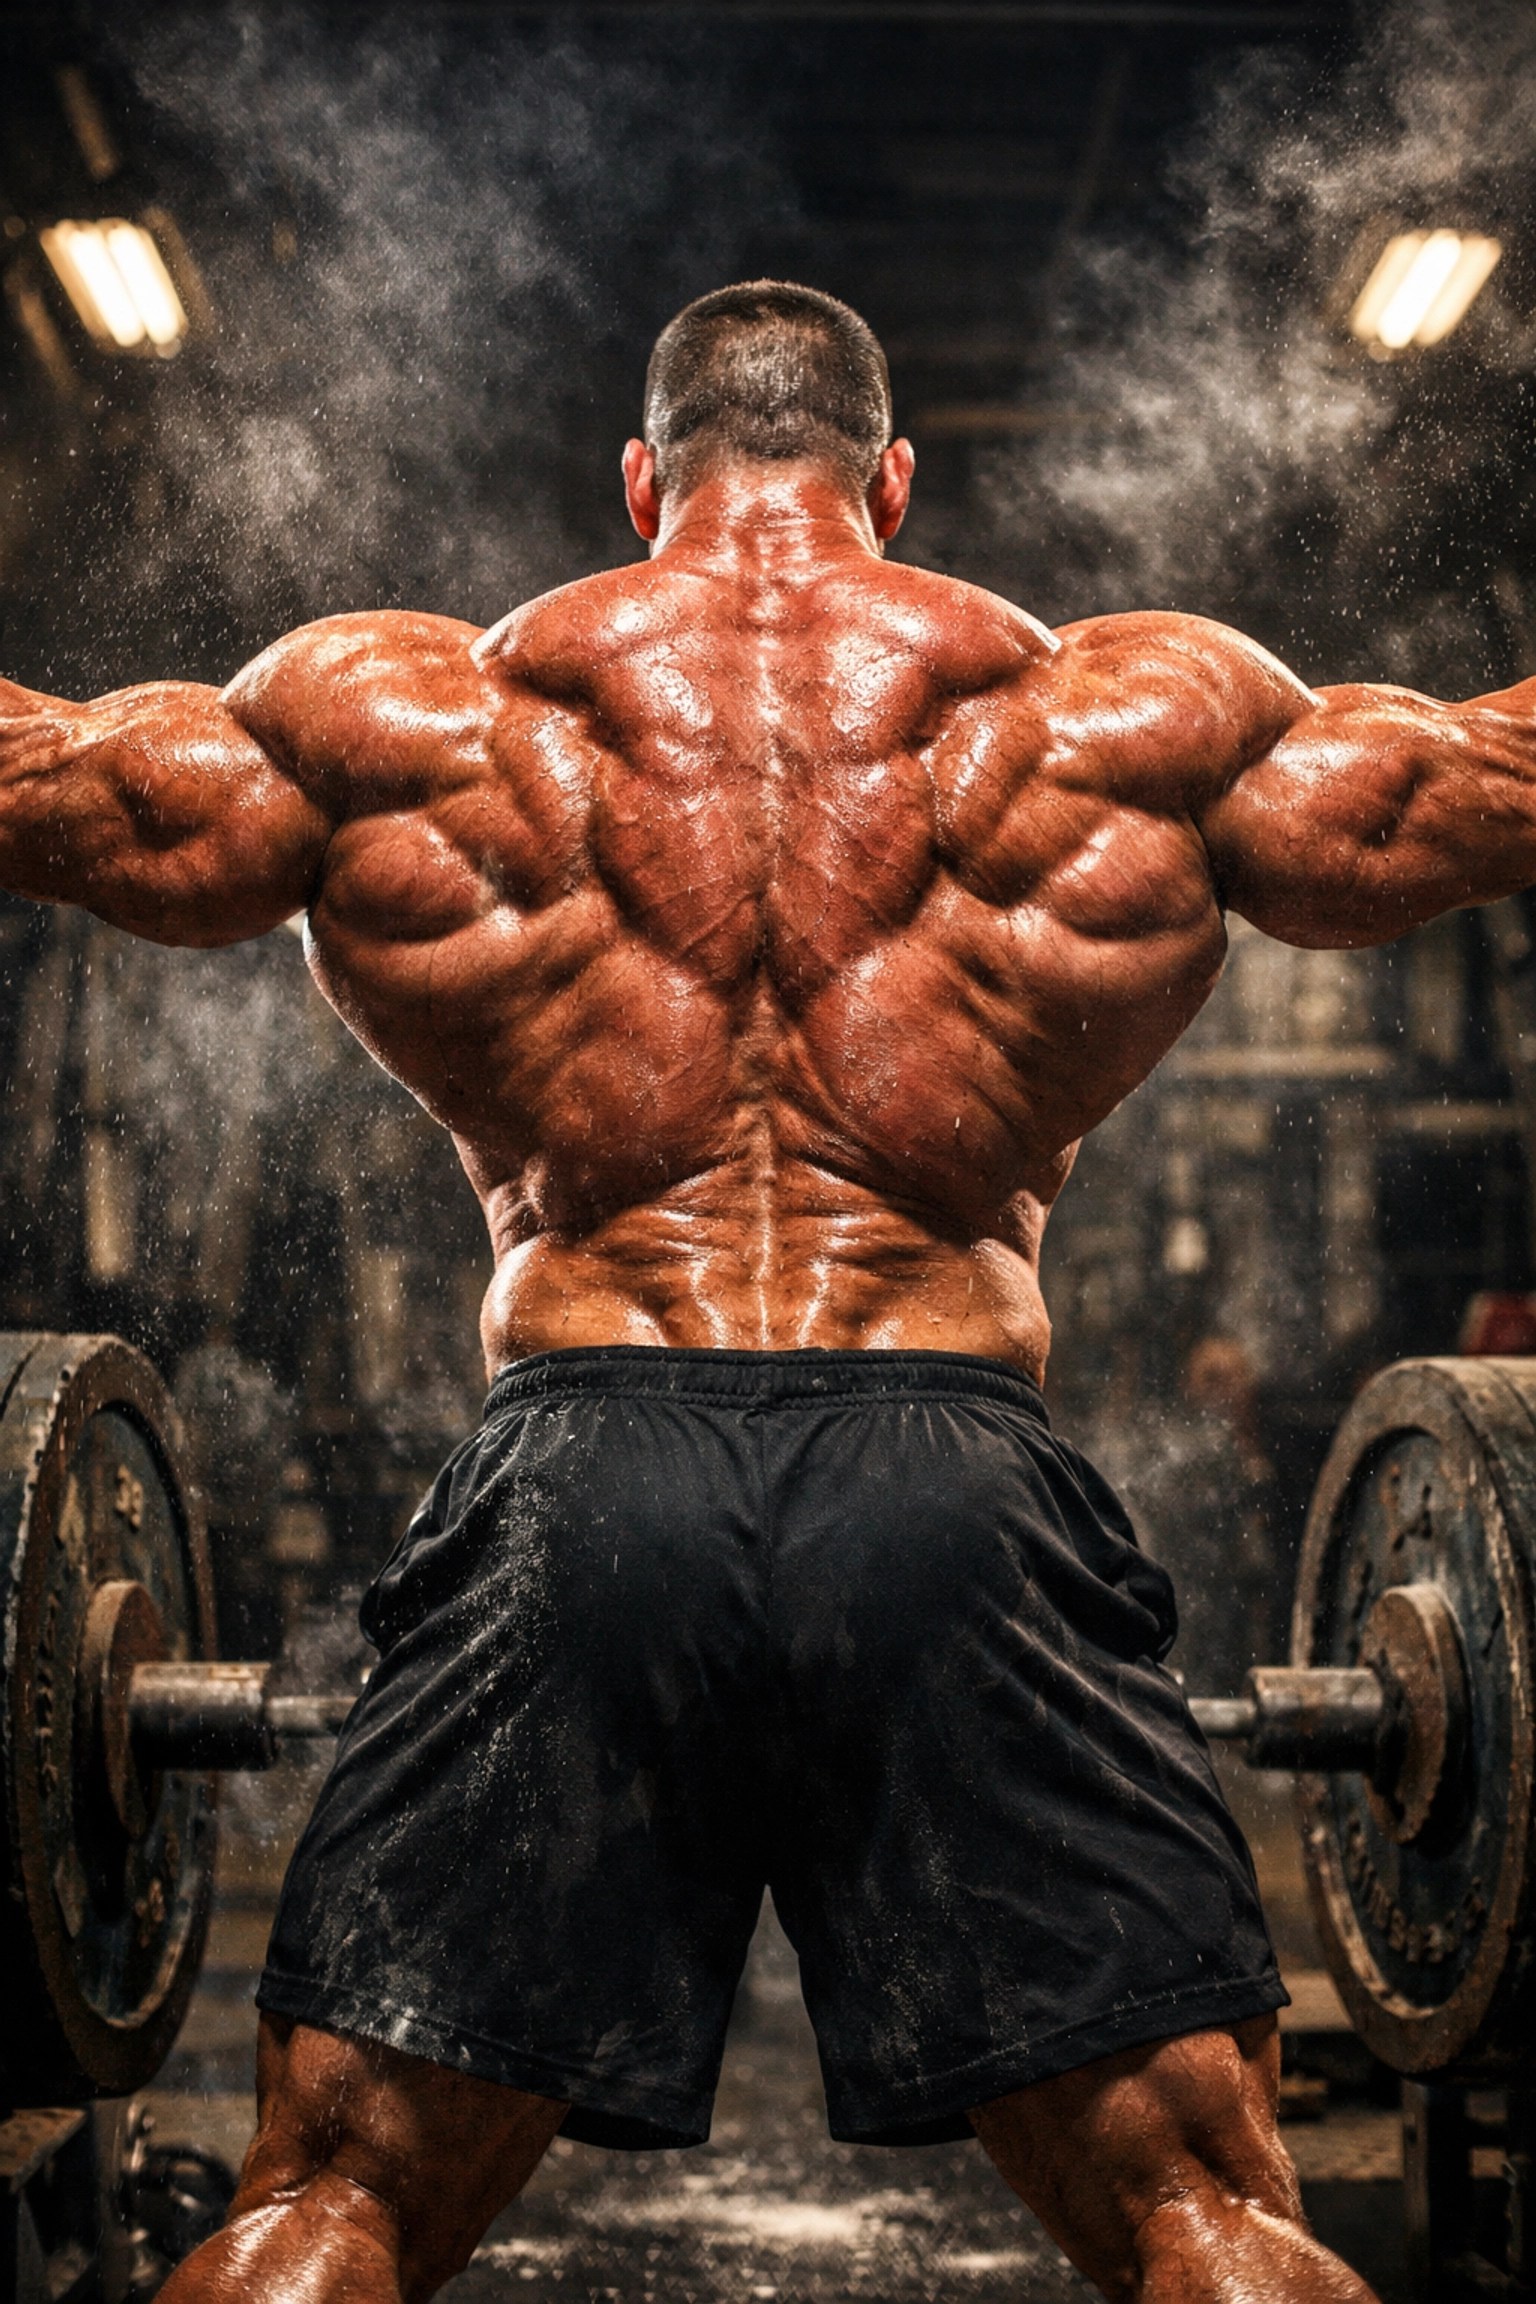
Execution: The Rear Lat Spread
While the front spread shows width, the rear lat spread shows the "map" of your back: the thickness, the Christmas tree (lower back development), and the sheer scale of the muscle.
- The Set-Up: Turn your back to the mirror. Step one leg back and spike the toe to flex your calf.
- The Grip: Just like the front version, place your hands on your waist.
- The Lean: Many beginners lean too far back. Instead, keep a slight forward tilt to let the lats "hang" and appear wider.
- The Expansion: Pull your shoulder blades apart (protraction) while driving the elbows out. You aren't squeezing your back together; you are spreading it open like a curtain.
Training for Maximum Width
You can’t pose muscle that isn’t there. To build a back that actually has something to spread, you need to focus on vertical pulling and movements that emphasize the stretched position of the lat.
- Wide-Grip Pull-Ups: The gold standard. If you can't do bodyweight pull-ups, use a band for assistance rather than switching to a machine. The stabilization required for a pull-up builds a denser back.
- Straight-Arm Pulldowns: This is a pure isolation move. It’s perfect for building that mind-muscle connection because it removes the biceps from the equation entirely.
- Weighted Rows: While rows are often seen as "thickness" builders, they contribute significantly to the lower lat development needed for a complete spread.
Recovery: Why RICE is Dead and Menthol is a Placebo
You’ve put in the work. You’ve hit 20 sets of heavy back movements and practiced your posing for 30 minutes. Now comes the recovery phase. This is where most athletes fail by following outdated advice.
For decades, the RICE method (Rest, Ice, Compression, Elevation) was the go-to. However, modern sports science suggests that icing actually delays healing. Ice constricts blood vessels, slowing down the delivery of the very nutrients your muscles need to repair the micro-tears caused by training.
Furthermore, many athletes reach for menthol-based creams (like Icy Hot). While these provide a "cooling" or "burning" sensation, they are largely a placebo for actual healing. They mask the pain by confusing your nerves, but they do absolutely nothing to reduce deep-tissue inflammation or accelerate muscle fiber repair.
The Natural Alternative: Healing Clay
If you want real recovery, you need to look at mineral-based solutions. Elite athletes are increasingly moving away from chemical-laden topicals and toward products like Clayer.
Unlike menthol, which just sits on the skin, high-quality French healing clay works by drawing out toxins and providing a massive dose of minerals that aid in cellular repair. It’s not about "masking" the soreness of a heavy back day; it's about reducing the inflammation so you can get back under the bar sooner. Natural healing allows for better blood flow, which is essential for muscle hypertrophy.
The Role of Nutrition and Sleep
You cannot out-train a bad diet, and you certainly can't out-recover a lack of sleep. To maintain the muscle density required for a pro-level lat spread, your body needs the building blocks of repair.
- Protein Synthesis: Ensure you’re hitting at least 1 gram of protein per pound of body weight. Without this, your back training is just spinning your wheels.
- Hydration: Muscles are roughly 75% water. A dehydrated muscle is a flat muscle. If you want your lats to "pop" during a pose, you need to be fully hydrated.
- Sleep: This is when your growth hormone peaks. Aim for 7-9 hours of quality sleep. If you’re struggling with soreness keeping you awake, applying a natural recovery poultice before bed can help settle the inflammation without the "jittery" feel of chemical pain relievers.
Consistency: The Gritty Path to a Pro Back
Building a wide back is a journey of sweat, setbacks, and hundreds of hours in the gym. There will be days when your lats feel like lead and your grip strength fails before your back does. These are the days that matter.
Whether you are a competitive bodybuilder or a high-impact athlete: like the skateboarders who rely on back and core strength for aerial stability: recovery is your greatest tool. High-impact sports place immense stress on the joints and connective tissues.
Take, for instance, a skateboarder performing a high-flying trick. The landing requires incredible eccentric control of the back and legs.

The physical demands are different from a bodybuilding stage, but the recovery needs are the same: reducing inflammation, maintaining mobility, and ensuring the muscles are ready for the next session.
Final Thoughts
The lat spread is more than a pose; it’s a testament to your dedication to training and your mastery over your own body. By focusing on the mind-muscle connection, perfecting your posing technique, and utilizing modern, natural recovery methods over outdated placebos, you’ll develop the width and control that sets the pros apart from the amateurs.
Keep pulling, keep posing, and most importantly, keep recovering properly. Your "wings" are waiting.
Leave a Reply